HudsonJet.net | 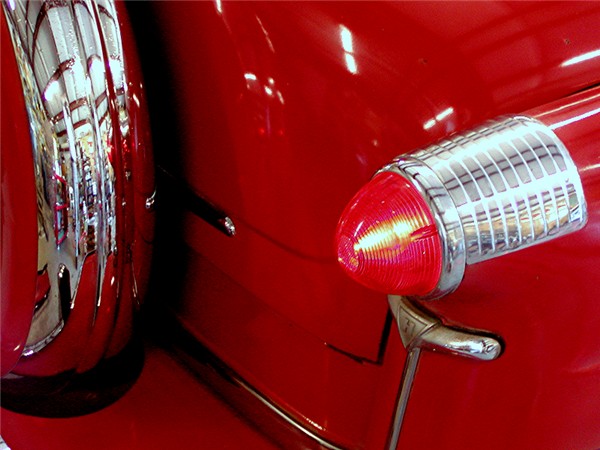 |
DISCLAIMER: Unless otherwise noted, service information has been provided by an edition of the Mechanical Procedures Manual for Jet models. The data from the Manual includes information covering specifications, adjustments and detailed operation involved in maintenance and repair procedures. After market updates from Hudson Service Merchandisers and other sources have been added as well and are credited in italics. HudsonJet.net provides this reference as a courtesy and is not responsible for any work done using Hudson Motor Car Company's publications or other sources provided on this site. |
|
Type
Tire Size
Wheel Sizes
Inflation Pressure
Front 15 x 5.90 24 lbs.
Front 15 x 6.40 24 lbs. | Super Cushion
15 x 5.90
15 x 6.40
15 x 4.00
15 x 4.50
Rear 24 lbs.
Rear 22 lbs. |
|
The tires and wheels are balanced when they leave the factory, however, subsequent tire wear causes them to go out of balance. To prolong tire lift, it is recommended that the wheel and tire assemblies be checked for balance every 2,500 miles and whenever a tire is removed for repair or after it has been recapped.
It is essential to maintain wheel and tire balance at all times to prevent uneven tire wear, high speed wheel tramp and excessive wear on front suspension and steering gear parts. Correct balance also contributes to ease of handling and riding comfort.
The tire side walls have a red dot to indicate where the valve stem is to be placed in order to maintain original balance.
|
FIGURE 1
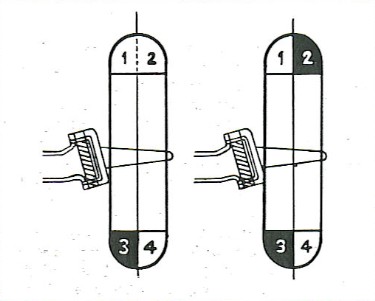 |
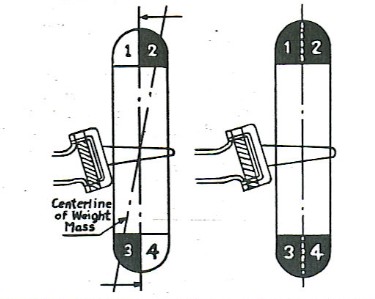
BALANCING THE WHEEL AND TIREWheel balance is the equal distribution of weight of the wheel and tire assembly around the axis of rotation (static balance) and through the center line of the wheel and tire (dynamic balance).
Wheel and tire assemblies must be balanced both statically, Figure 1, an dynamically, Figure 2.
If the action of the front wheels causes a distrubance at the steering wheel, the first tiems to check are air pressure and balance of the front wheels and tires.
Wheels may be statically balanced on the steering spindle of the car, although the use of an accredited wheel balancing fixture will facilitate the operations.
NOTE: If wheels are checked for balance on steering spindle - make sure brakes are fully released and the front wheel bearings properly adjusted.
|
FIGURE 2
 |
Maintaining proper tire pressure is the most important factor in obtaining maximum tire life, proper car handling / ease of handling, riding comfort / best riding qualities, and gasoline economy. To achieve this, the tire air pressure should be checked once a week. On long trips or if the car is driven extensively, they should be checked every morning before starting out.
The air pressure in the tires will increase due to road onctact and internal friction more so in hot weather and after hard driving. The normal increase in pressured due to high temperature will build-up to about five pounds above "cold" pressure. Air pressure should always be checked when tires are cold to compensate for increase of pressure and ensure accutate pressure checks. Never reduce (bleed) tire build-up pressure in a tire. The tire is designed to protect itself by building up a safe pressure of a few pounds after it is run. This avoids excessive sidewall flexing and heat - both of which are detrimental to a tire.
Avoid curb scraping, maintain correct tire inflation pressures. Avoid excessive speeds on curves, unnecessary braking and spinning of the wheels on fast starts.
|
Tire valve caps should be finger tight to prevent loss of air which may escape from a leaky valve, also to prevent dust and dirt getting into the valve. Replace any missing valve caps.
Too much tire pressure will cause tires to wear too fast in the center of the tread and will make it easier to break or bruise. Under inflation will cause rapid wear on the outer edges of the tread and increases rolling resistance of the car.
The correct tire pressures are:
Size
5.90 x 15
6.40 x 15 | Front
24 lbs. cold
24 lbs. cold | Rear
24 lbs. cold
22 lbs. cold |
|
 |
ROTATION OF TIRES
Tire wear is actually more rapid on rear tires and is more uniform than on front tires. The tire treads are flexed in one direction while the engine is driving the car and in the opposite direction when brakes are applied; this action accounts for their even wear.
|
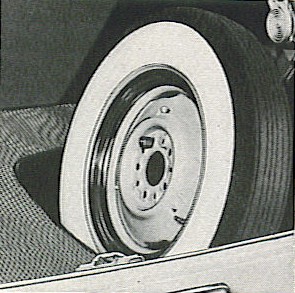
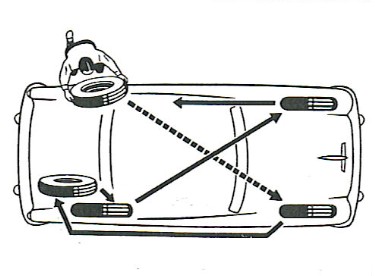
Tire rotation is very important to obtain maximum tire wear. Tires should be rotated every 2500 to 3,000 miles; they will last much longer. The proper method would be to place the left front tire and wheel assembly on the left rear hub and move the right front tire and wheel assembly to the spare wheel position; place the right rear assembly on the left front hub and the left rear assembly to the right front hub. The spare wheel assembly will be installed on the right rear hub, Figure 3. Switching the tires in this manner changes their directon of rotation and equalizes the wear of 5 tires instead of 4.
Never bo too hasty in diagnosing uneven tire wear as improper front wheel alignment.
The following conditions should always be checked when uneven tire wear is present and in the order listed below:
- Tire pressure
- Wheel bearing adjustment
- Brake adjustment
- Wheel and tire balance
- front wheel alignment
|
FIGURE 3
 |
CHANGING THE WHEEL AND TIRE
To avoid having more than one wheel jacked up at a time, always start by installing the spare wheel and tire first, then follow through as shown in Figure 3. Remove the spare tire and wheel from the rear compartment by taking out the clamp bolt and plate, using the wheel hub bolt wrench.
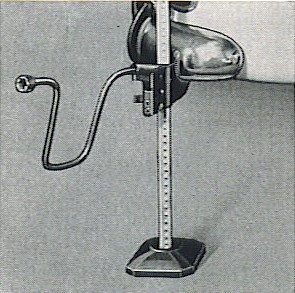
Set the parking brake securely and block the wheel opposite the one being changed to prevent any movement of the car. Set the jack base on a level and solid footing and engage the lifting lug of the jack in the socket of the frame pad as shown in Front Jack figure and Rear Jack figure.
|
FRONT JACK POSITIONING
 |
The small lever located at the left side of the jack should be up when raising the car and down when lowering the car. Use the wheel bolt wrench to operate the jack.
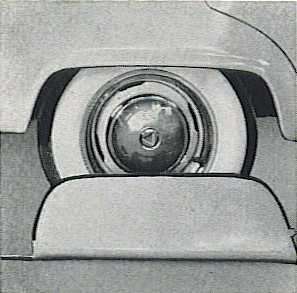
When removing a rear wheel, take off the wheel cover, by raising up the loop at the rear end until it is clear of its hook, then pull cover backward to disengage lug at front end. (See Wheel Cover figure.)
Raise the car, turn wheel until pilot stud is at top, remove all wheel hub bolts and wheel and tire.
|
REAR JACK POSITIONING
 |
Install wheel with pilot stud in the top position, then slide the wheel onto the hub using the pilot stud as a guide. install and tighten wheel bolts finger tight then lower car so that the tire just contacts the road surface. This will keep the wheel from turning during final tightening with the wheel hub bolt wrench. After tightening the hub bolts, replace hub cap, lower car and place spare tire in rear compartment.
|
WHEEL COVER
 |
WHEEL BEARINGS
Loose or worn wheel bearings, permitting the wheel to wobble, will cause scuffing of tires or even permit brakes to drag intermittently.
- Jack up the wheel so it will revolve.
- Remove outer and inner hub caps.
- Remove cotter pin and turn adjusting nut to the right sufficiently to insure all parts are properly seated and then back off nut until a slight drag is felt when turning the wheel by hand.
- Loosen the nut sufficiently to allow the wheel to turn freely.
- Install new cotter key and clinch it.
- Install inner and outer hub caps and lower car to the floor.
What is the bolt pattern?
The bolt pattern on Hudsons is 5 on 4.5 spacing, which is standard on Chrysler cars up into the late 80s. (Except the older Imperial and 1/2 ton Dodge PUs, which are 5 on 5.5, same as Jeep and Ford PUs.)
Look out for the center hole size, on Fords its smaller and won't fit on Hudson properly. A hole for the Hudson line up pin will need to be drilled in most wheels.
Mopar, AMC, and Studebaker wheels DO work on the Hudsons.
Front Wheel Bearings: Timkin: Cone 15125-T / Cup 15245-T....
The 15125-T cone is not too difficult to find here but the prices are frightening, indeed, if you are seeking new ones. The 15245-T cup is common and quite inexpensive (<$10 US, I'd guess). I have found that there are 3 cones in Australia of Timkin manufacture. I don't know where they are located but it is Lewis International Bearing Co., phone # +61 394 653 622. Not being familiar with phone number arrangement there, I can't be sure that I've written it correctly. I have located many new 15125-T here as well but would need to buy a minimum of 10 units to "enjoy" a price of about $300 each.
I have always wondered why Hudson used the tapered-bore bearing in the Jet when the similar 25877-T for the senior Hudson was dropped in mid-year '52 in favor of the 25877 straight-bore bearing used in the Spicer built axles. It is not of any consequence who the manufacturer is unless you are insistent upon a Bower. They are all dimensionally identical.
In further regard to wheel bearings, a JetSetter suggested looking at Auto Zone�s Part #15125 for $14.99 or Part #15245 (for race) for $5.19. This is NOT the same bearing and any attempt to install it (esp. by a novice) may result in damage and/or a dangerous situation. That "T" suffix is an all-important designation (15125-T) that indicates a tapered bore, not to be confused with the term "tapered roller bearing�. The correct 15125-T has been found in a few places ranging in price from $280 to $800+ EACH. So, take good care of your Jet rear wheel bearings. You DON'T want to pay for new ones! Seriously, there are some idiosyncrasies about the Jet rear axle housing that could be modified and one of them directly affects the wheel bearings. That is an article for down the road!
Wheel Cylinder Kit (Front): Safeline Master 104 & EIS DC & United 170 & Wagner 13677
Wheel Cylinder Kit (Rear): Safeline Master 118 & EIS Ah & United 349 & Wagner 53512, 13641
TIRE REPLACEMENT:
On the side of every tire is an alphanumeric system that describes the tire and its performance characteristics. The typical tire size system will appear as a string of letters and numbers such as: P195/75R15, which is the tire size I have on my own Jet.
P: The first letter in the tire size indicates the type of tire and intended use. In this example, the first letter, �P�, indicates the tire is a metric size used primarily on passenger vehicles. Other letter designations include T (Temporary Spare), LT (Light Truck Metric), C (Commercial), and ST (Special Trailer Service).
195: The numbers following the first letters -- before the slash (/) -- indicate the section width of the tire; the widest point from sidewall-to-sidewall. The larger this number, the wider the tire. This number is the width of the tire in millimeters. In this example, the tire has a 195-millimeter width.
75: The next number following the slash (/) is the aspect ratio that indicates the height of the tire in a percentage of the section width. In our example, the number is 75, which means the tire height is 75% of the section width (195 millimeters). The height of this tire would be 146.25 millimeters. The lower the number, the lower the profile of the tire.
R: The next letter reveals the construction of the tire. The most common is �R� such as found in our example. The �R� designation states the tire is of radial construction. Other construction types are rare for modern passenger car use and may include �D� for bias ply construction and �B� for belted tires. Some vintage car owners prefer the authenticity of bias ply. This is okay for occasional around town driving, but radial is suggested for high use and highway speeds.
15: The number following the construction code is the size of the wheel that the tire will fit in inches. The example tire would be designed to fit a 15-inch wheel, commonly referred to as rim. Tire sizes on modern vehicles typically start at 13-inches and go up to 18-inches, but aftermarket and special package wheels can be 22-inches or even larger.
Conversion Chart:
| Old Size |
Letter Size |
82 Series |
80 Series |
75 Series |
70 Series |
65 Series |
60 Series |
50 Series |
| 6.00-15 |
B |
165/82R15 |
165/80R15 |
|
185/70R15 |
195/65R15 |
205/60R15 |
225/50R15 |
| 6.50-15 |
C |
175/82R15 |
|
|
195/70R15 |
205/65R15 |
215/60R15 |
|
| 6.70-15 |
F |
195/82R15 |
|
205/75R15 |
215/70R15 |
|
235/60R15 |
|
| 6.85-15 |
C |
175/82R15 |
|
|
195/70R15 |
205/65R15 |
215/60R15 |
|
| 7.10-15 |
G |
205/82R15 |
|
215/75R15 |
225/70R15 |
235/65R15 |
245/60R15 |
265/50R15 |
| 7.35-15 |
E |
185/82R15 |
|
195/75R15 |
205/70R15 |
215/65R15 |
225/60R15 |
|
|
|
|
|
Courtesy 2015 HudsonJet.net - All Rights Reserved.
|
|